

How To Create A Login Page In Angular 7
Usability is a key aspect to consider when creating a web application, and that means designing a clean, easy-to-understand user interface. Leveraging common design languages can help make that goal a reality with their recognizable components that many users will understand right away. However, unlike desktop apps where the operating system provides a set of uniform widgets, there has historically been no common design language to lean on for web app developers.
That was until Google released its Material Design in 2014. Material Design was born from the desire to create a common user experience across Android devices and web applications and consists of a number of components that are available for both Android and JavaScript applications.
Since its original publication, Material Design has become extremely popular. Many libraries have been developed that incorporate the components into existing frameworks. Within Angular applications, you can use the angular-material library. This makes the complete set of Material components available for your Angular templates. Of course, once you have decided to use Material Design in your application you will want to make sure that every part of the app uses it. After all, it is supposed to be a common design language.
Many modern applications make use of single-sign-on services such as Okta. In its default configuration, Okta will redirect the user to a hosted login page and, after a successful sign-in redirect them back to the application. If you're using material design in your application, you might want to create your own login form, so it looks similar to the rest of your app. Luckily, Okta makes this easy to do.
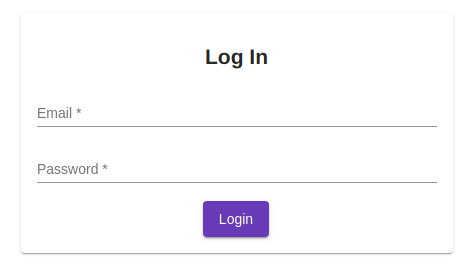
In this tutorial, I'll show you how to create a login form like the one above. You'll create an Angular app, use Material Design, and make it require user login. Okta provides a library specifically for Angular applications, but I will be using the more low-level okta-auth-js library. This library allows you to have full control over your HTML and just handles communication with Okta's API. All of Okta's JavaScript libraries are built on top of okta-auth-js. To make the application a bit more interesting, I will be creating a small tic-tac-toe game that will be protected using Okta for authentication.
Table of Contents
- Build an Angular Material App with Secure Login
- Add Angular Material CSS
- Import Angular Material Components
- Build a Gameboard with Angular Material
- Implement Your Game Logic With Angular Components
- Add Routes to Your Angular Components
- Add Secure Sign In to Your Angular App
- Make Angular Tests Pass With Angular Material
- Learn More About Angular Material and Secure Login
Build an Angular Material App with Secure Login
To get started, you will need to install the Angular command-line tool. I will assume that you have some familiarity with JavaScript and that you have Node installed on your system together with the Node Package Manager npm. Open a terminal and type the following command.
npm install -g @angular/cli@11 Depending on your operating system, you might have to run this using the sudo command. This will install the Angular command-line tool on your system. It lets you use the ng command to set up and manipulate Angular applications. To create a new application navigate to a directory of your choice and run the following.
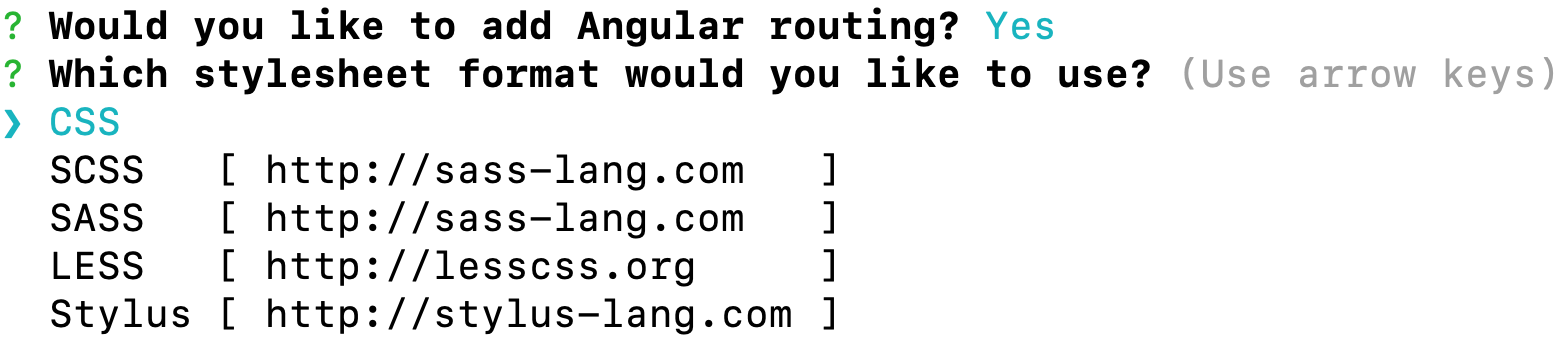
ng new material-tic-tac-toe You will be asked three questions. Answer Yes to the first two questions. This will enable stricter type checking and set up the router in your application. The router is responsible for letting the user navigate between different parts of the app and updating the browser's URL without actually reloading the page. For the third question, accept the default choice CSS. This application will use simple CSS stylesheets, but you can see how easy it is to switch to a different stylesheet technology with Angular.
Once the wizard has completed you should see a new folder called material-tic-tac-toe. Navigate into the folder and install some packages you will need for the application by running the command below.
npm install -E @angular/material@11.2.6 @angular/flex-layout@11.0.0-beta.33 hammerjs@2.0.8 \ @angular/cdk@11.2.6 tic-tac-toe-minimax@1.0.8 The @angular/material package provides the components of the Material Design, @angular/cdk is a component development kit that is needed for the Material components to work and hammerjs is a library that provides smooth animations for the component. @angular/flex-layout provides a flexible and responsive grid. It is independent of the Material components but is often used together with it. Finally, tic-tac-toe-minimax is a ready-to-go tic-tac-toe game with a computer player.
Add Angular Material CSS
The Material components do not include the web-font for the Material Icon set. In order to use the icons, open src/index.html in your IDE and add the following line inside the <head> tag.
<link href= "https://fonts.googleapis.com/icon?family=Material+Icons" rel= "stylesheet" > To make hammerjs available to the application open src/main.ts and add the following import to the top of the file.
Next, add the Material Design stylesheet to your application. Open src/styles.css and paste the code below into the file.
@import "~@angular/material/prebuilt-themes/deeppurple-amber.css" ; body { margin : 0 ; font-family : sans-serif ; } h1 { text-align : center ; } The @import statement imports a pre-built theme into the CSS file. I have also added a bit of styling for the body and h1 elements. Next, you need to import all the modules you will be needing into the application.
Import Angular Material Components
Open src/app/app.module.ts and add the imports below to the top of the file.
import { FlexLayoutModule } from ' @angular/flex-layout ' ; import { FormsModule , ReactiveFormsModule } from ' @angular/forms ' ; import { BrowserAnimationsModule } from ' @angular/platform-browser/animations ' ; import { MatToolbarModule } from ' @angular/material/toolbar ' ; import { MatInputModule } from ' @angular/material/input ' ; import { MatCardModule } from ' @angular/material/card ' ; import { MatMenuModule } from ' @angular/material/menu ' ; import { MatIconModule } from ' @angular/material/icon ' ; import { MatButtonModule } from ' @angular/material/button ' ; import { MatTableModule } from ' @angular/material/table ' ; import { MatDividerModule } from ' @angular/material/divider ' ; import { MatSlideToggleModule } from ' @angular/material/slide-toggle ' ; import { MatSelectModule } from ' @angular/material/select ' ; import { MatOptionModule } from ' @angular/material/core ' ; import { MatProgressSpinnerModule } from ' @angular/material/progress-spinner ' ; Now scroll down in the same file and find the imports declaration. Change it to match the following.
imports : [ BrowserModule , AppRoutingModule , FlexLayoutModule , FormsModule , ReactiveFormsModule , BrowserAnimationsModule , MatToolbarModule , MatInputModule , MatCardModule , MatMenuModule , MatIconModule , MatButtonModule , MatTableModule , MatDividerModule , MatSlideToggleModule , MatSelectModule , MatOptionModule , MatProgressSpinnerModule ], Now that you're done with all the preliminaries, it's time to start implementing the game application.
Build a Gameboard with Angular Material
Start with the main application component. Open src/app/app.component.html and replace the default contents with the following code.
<mat-toolbar color= "primary" class= "expanded-toolbar" > <span> <button mat-button routerLink= "/" >{{title}}</button> <button mat-button routerLink= "/" ><mat-icon>home</mat-icon></button> </span> <div fxLayout= "row" fxShow= "false" fxShow.gt-sm > <button mat-button routerLink= "/login" *ngIf= "!isAuthenticated" > <mat-icon>power_settings_new</mat-icon> Login </button> <button mat-button *ngIf= "isAuthenticated" (click)= "logout()" > <mat-icon>exit_to_app</mat-icon> Logout </button> <button mat-button routerLink= "/game" > <mat-icon>gamepad</mat-icon> Play </button> </div> <button mat-button [mat-menu-trigger-for]= "menu" fxHide= "false" fxHide.gt-sm > <mat-icon>menu</mat-icon> </button> </mat-toolbar> <mat-menu x-position= "before" #menu =" matMenu " > <button mat-menu-item routerLink= "/" > <mat-icon>home</mat-icon> Home </button> <button mat-menu-item routerLink= "/game" > <mat-icon>gamepad</mat-icon> Play </button> <button mat-menu-item routerLink= "/login" *ngIf= "!isAuthenticated" > <mat-icon>power_settings_new</mat-icon> Login </button> <button mat-menu-item *ngIf= "isAuthenticated" (click)= "logout()" > <mat-icon>exit_to_app</mat-icon> Logout </button> </mat-menu> <router-outlet></router-outlet> This code contains the main toolbar and menu of the application. Only a small amount of styling is needed. Paste the following into src/app/app.component.css.
.expanded-toolbar { justify-content : space-between ; align-items : center ; } Now, open src/app/app.component.ts and modify the component title and add an isAuthenticated property. The contents of the file should look like this.
import { Component } from ' @angular/core ' ; @ Component ({ selector : ' app-root ' , templateUrl : ' ./app.component.html ' , styleUrls : [ ' ./app.component.css ' ] }) export class AppComponent { title = ' Tic Tac Toe ' ; isAuthenticated = false ; async logout (): Promise < void > { // todo } } Open your terminal again and create two components home, and game by running the commands below.
ng generate component home ng generate component game The home component simply contains a splash screen with the game title. Replace the contents of src/app/home/home.component.html with the following line.
The game component will need a bit more editing. Start with the template and open src/app/game/game.component.html. Replace the contents of the file with the following code.
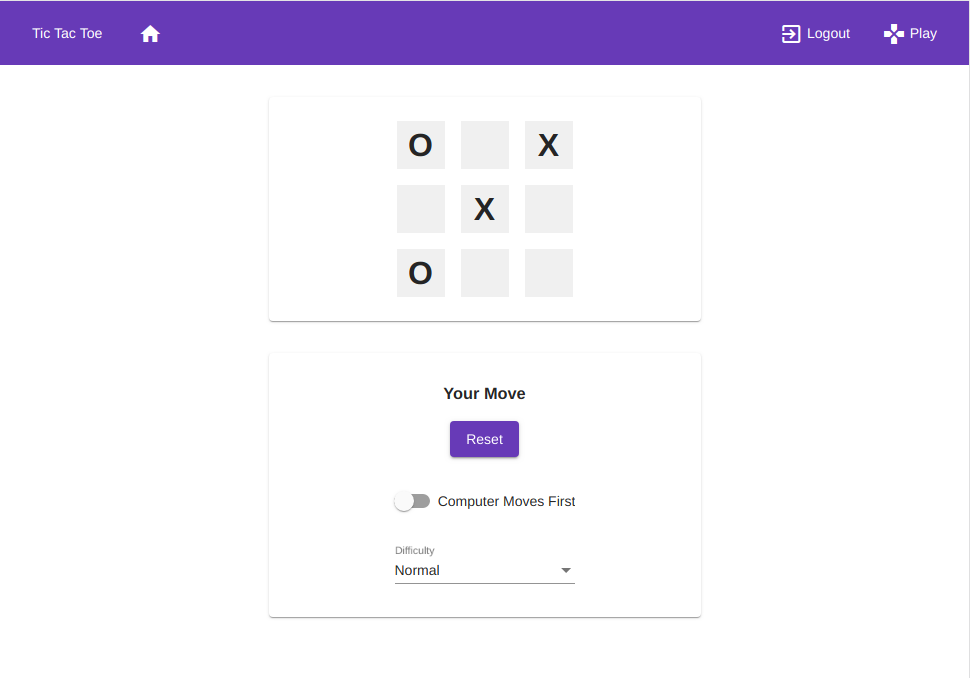
<mat-card> <mat-card-content> <div [ngClass]= "{'tic-tac-toe': true, playing: playing}" > <div class= "game-field" *ngFor= "let field of gameState; let i = index" (click)= "makeHumanMove(i)" > {{field === 'X' || field === 'O' ? field : ''}} </div> </div> </mat-card-content> </mat-card> <mat-card> <mat-card-content> <div *ngIf= "playing" > <h3>Your Move</h3> </div> <div *ngIf= "!playing" > <h3>{{winner || "Start a new game"}}</h3> </div> <button mat-raised-button color= "primary" *ngIf= "!playing" (click)= "toggleGame(true)" >Start</button> <button mat-raised-button color= "primary" *ngIf= "playing" (click)= "toggleGame(false)" >Reset</button> <mat-slide-toggle [(ngModel)]= "computerFirst" >Computer Moves First</mat-slide-toggle> <mat-form-field> <mat-label>Difficulty</mat-label> <mat-select [(ngModel)]= "difficulty" > <mat-option value= "Easy" >Easy</mat-option> <mat-option value= "Normal" >Normal</mat-option> <mat-option value= "Hard" >Hard</mat-option> </mat-select> </mat-form-field> </mat-card-content> </mat-card> The code above defined two cards. The top card contains the current game state. It also lets the user click on any of the fields to make a move. The bottom card contains the game controls. Add some styling by pasting the following code into src/app/game/game.component.css.
mat-card { max-width : 400px ; margin : 2em auto ; text-align : center ; } mat-card-content { display : flex ; flex-direction : column ; justify-content : center ; align-items : center ; } .tic-tac-toe { width : 192px ; display : flex ; flex-wrap : wrap ; } .game-field { width : 48px ; height : 48px ; margin : 8px ; background-color : #f0f0f0 ; line-height : 48px ; font-size : 32px ; font-weight : bold ; } .playing .game-field { cursor : pointer ; } button , mat-slide-toggle { margin-bottom : 2rem ; } Implement Your Game Logic With Angular Components
The actual game logic lives in src/app/game/game.component.ts. It is using the tic-tac-toe-minimax library to calculate computer moves and determine the winner. Replace the contents of the file with the code below.
import { Component } from ' @angular/core ' ; import Minimax from ' tic-tac-toe-minimax ' ; const { GameStep } = Minimax ; @ Component ({ selector : ' app-game ' , templateUrl : ' ./game.component.html ' , styleUrls : [ ' ./game.component.css ' ] }) export class GameComponent { public gameState : Array < number | string > = [ 0 , 1 , 2 , 3 , 4 , 5 , 6 , 7 , 8 ]; public winner : string | undefined ; public playing = false ; public computerFirst = false ; public difficulty : ' Easy ' | ' Normal ' | ' Hard ' = ' Normal ' ; toggleGame ( toggle : boolean ): void { if ( toggle === this . playing ) { return ; } this . gameState = [ 0 , 1 , 2 , 3 , 4 , 5 , 6 , 7 , 8 ]; this . winner = undefined ; if ( toggle && this . computerFirst ) { this . makeComputerMove (); } this . playing = toggle ; } makeComputerMove (): void { const symbols = { huPlayer : ' X ' , aiPlayer : ' O ' }; const winnerMapping : {[ index : string ]: any } = { huPlayer : ' Human Wins! ' , aiPlayer : ' Computer Wins! ' , draw : ' It \' s a Draw! ' }; const result = GameStep ( this . gameState , symbols , this . difficulty ); this . gameState = result . board ; if ( result . winner ) { this . winner = winnerMapping [ result . winner ]; this . playing = false ; } } makeHumanMove ( field : number ): void { if ( ! this . playing || typeof this . gameState [ field ] !== ' number ' ) { return ; } this . gameState [ field ] = ' X ' ; this . makeComputerMove (); } } NOTE: You will get an error about import Minimax. To fix it, create a src/tic-tac-toe.d.ts with the following code.
declare module ' tic-tac-toe-minimax ' ; To complete the game, you will need to define the routes to the two components.
Add Routes to Your Angular Components
Open src/app/app-routing.module.ts and add the following imports to the top of the file.
import { HomeComponent } from ' ./home/home.component ' ; import { GameComponent } from ' ./game/game.component ' ; Next, change the routes array to match the following.
const routes : Routes = [ { path : '' , component : HomeComponent }, { path : ' game ' , component : GameComponent , }, ]; This completes the implementation of the game. You should now be able to open a terminal and run the following command:
Open your browser and navigate to http://localhost:4200. Click on the Play link in the top menu, and you should see a fully functional tic-tac-toe game. Note that the Login link is not yet wired up. If you click on it, nothing will happen, and you can see an error message in the browser's console.
Add Secure Sign In to Your Angular App
Before you begin, you'll need a free Okta developer account. Install the Okta CLI and run okta register to sign up for a new account. If you already have an account, run okta login. Then, run okta apps create. Select the default app name, or change it as you see fit. Choose Single-Page App and press Enter.
Use http://localhost:4200/login for the Redirect URI and set the Logout Redirect URI to http://localhost:4200.
What does the Okta CLI do?
The Okta CLI will create an OIDC Single-Page App in your Okta Org. It will add the redirect URIs you specified and grant access to the Everyone group. It will also add a trusted origin for http://localhost:4200. You will see output like the following when it's finished:
Okta application configuration: Issuer: https://dev-133337.okta.com/oauth2/default Client ID: 0oab8eb55Kb9jdMIr5d6 NOTE: You can also use the Okta Admin Console to create your app. See Create an Angular App for more information.
You will be implementing a login form as part of your application. Before continuing, a few warnings. If you decide to run a production environment in which you host your own login form, make sure that you are using the secure HTTPS protocol, and you are hosting your site with a valid SSL certificate. Also, make sure to never store the login data in a session variable or the browser's storage. If you fail to take the necessary security precautions, your site may be vulnerable to attacks. As mentioned above, you will not be using any of the Angular-specific Okta libraries. Instead, install the okta-auth-js package by opening the terminal in the project's root folder and typing the following command.
npm install -E @okta/okta-auth-js@4.8.0 With this, you are ready to create the authentication service. In the terminal, type the following command.
Now open the newly created file src/app/auth.service.ts. This file is where all the magic happens. Paste the following contents into the file. I will walk you through the code step-by-step below.
import { Injectable } from ' @angular/core ' ; import { BehaviorSubject } from ' rxjs ' ; import { Router } from ' @angular/router ' ; import OktaAuth from ' @okta/okta-auth-js ' ; @ Injectable ({ providedIn : ' root ' }) export class AuthService { private authClient = new OktaAuth ({ issuer : ' https://{YourOktaDomain}/oauth2/default ' , clientId : ' {ClientId} ' }); public isAuthenticated = new BehaviorSubject < boolean > ( false ); constructor ( private router : Router ) { } async checkAuthenticated (): Promise < boolean > { const authenticated = await this . authClient . session . exists (); this . isAuthenticated . next ( authenticated ); return authenticated ; } async login ( username : string , password : string ): Promise < void > { const transaction = await this . authClient . signIn ({ username , password }); if ( transaction . status !== ' SUCCESS ' ) { throw Error ( ' We cannot handle the ' + transaction . status + ' status ' ); } this . isAuthenticated . next ( true ); this . authClient . session . setCookieAndRedirect ( transaction . sessionToken ); } async logout ( redirect : string ): Promise < void > { try { await this . authClient . signOut (); this . isAuthenticated . next ( false ); await this . router . navigate ([ redirect ]); } catch ( err ) { console . error ( err ); } } } The AuthService defines a member authClient that is initialized to be an OktaAuth object. This object encapsulates the authentication, session management, and communication with the Okta servers. The OktaAuth constructor takes several options. The options provided here are the issuer and the clientId. In these options, you will have to replace {YourOktaDomain} with your Okta domain. The {ClientId} needs to be replaced with the client ID you obtained when you registered your application with Okta.
The isAuthenticated property is a behavior subject that reflects whether the user is logged in or not. The AuthService also defines three asynchronous methods. The checkAuthenticated() method checks whether a user session exists and returns the outcome. It also updates the isAuthenticated subject. The login() method sends a sign-in request to the Okta server. On success, the user is authenticated and a session is established. The logout() method will sign out the user and redirect them to a specified route.
Now that the service is in place, you can use it in the application component. Open src/app/app.component.ts and modify the contents to match the code below.
import { Component , OnInit } from ' @angular/core ' ; import { AuthService } from ' ./auth.service ' ; @ Component ({ selector : ' app-root ' , templateUrl : ' ./app.component.html ' , styleUrls : [ ' ./app.component.css ' ] }) export class AppComponent implements OnInit { title = ' Tic Tac Toe ' ; isAuthenticated = false ; constructor ( public authService : AuthService ) { this . authService . isAuthenticated . subscribe ( ( isAuthenticated : boolean ) => this . isAuthenticated = isAuthenticated ); } async ngOnInit (): Promise < void > { this . isAuthenticated = await this . authService . checkAuthenticated (); } async logout (): Promise < void > { await this . authService . logout ( ' / ' ); } } The isAuthenticated variable is now initialized and updated by the authentication service. And the logout() method will sign the user out and redirect them to the home page.
Now create the login component. In the terminal, run the command below.
ng generate component login Open src/app/login/login.component.html and add the following login form.
<mat-card> <mat-card-content> <form [formGroup]= "form" (ngSubmit)= "onSubmit()" > <h2>Log In</h2> <mat-error *ngIf= "loginInvalid" > The username and password were not recognized </mat-error> <mat-form-field class= "full-width-input" > <input matInput placeholder= "Email" formControlName= "username" required > <mat-error> Please provide a valid email address </mat-error> </mat-form-field> <mat-form-field class= "full-width-input" > <input matInput type= "password" placeholder= "Password" formControlName= "password" required > <mat-error> Please provide a valid password </mat-error> </mat-form-field> <button mat-raised-button color= "primary" >Login</button> </form> </mat-card-content> </mat-card> Everything is contained in a <mat-card> element again. Note how the <mat-form-field> elements each contain an <input> as well as a <mat-error> element. The <mat-error> works seamlessly with Angular's form validation to provide useful feedback. As you might have guessed by now, src/app/login/login.component.css contains some styling. Paste the code below into the file.
mat-card { max-width : 400px ; margin : 2em auto ; text-align : center ; } mat-form-field { display : block ; } Now open src/app/login/login.component.ts and paste in the implementation of the login component.
import { Component , OnInit } from ' @angular/core ' ; import { FormBuilder , FormGroup , Validators } from ' @angular/forms ' ; import { ActivatedRoute , Router } from ' @angular/router ' ; import { AuthService } from ' ../auth.service ' ; @ Component ({ selector : ' app-login ' , templateUrl : ' ./login.component.html ' , styleUrls : [ ' ./login.component.css ' ] }) export class LoginComponent implements OnInit { form : FormGroup ; public loginInvalid = false ; private formSubmitAttempt = false ; private returnUrl : string ; constructor ( private fb : FormBuilder , private route : ActivatedRoute , private router : Router , private authService : AuthService ) { this . returnUrl = this . route . snapshot . queryParams . returnUrl || ' /game ' ; this . form = this . fb . group ({ username : [ '' , Validators . email ], password : [ '' , Validators . required ] }); } async ngOnInit (): Promise < void > { if ( await this . authService . checkAuthenticated ()) { await this . router . navigate ([ this . returnUrl ]); } } async onSubmit (): Promise < void > { this . loginInvalid = false ; this . formSubmitAttempt = false ; if ( this . form . valid ) { try { const username = this . form . get ( ' username ' )?. value ; const password = this . form . get ( ' password ' )?. value ; await this . authService . login ( username , password ); } catch ( err ) { this . loginInvalid = true ; } } else { this . formSubmitAttempt = true ; } } } There is not much happening here. ngOnInit() sets up the form. If the user is already authenticated, it requests the router to navigate to a different URL. The onSubmit() function handles the form submission. It extracts the values from the form elements and attempts to log in using AuthService.
The application is almost done. You have the authentication service and the login form in place. But, you also want to prevent the user from navigating to a part of the application that they are not authorized to see. Angular uses route guards for this. Create a new service by running the following command in the terminal.
ng generate service AuthGuard The guard implements the CanActivate interface and must implement the canActivate() function. Replace the contents of src/app/auth-guard.service.ts with the following.
import { Injectable } from ' @angular/core ' ; import { Router , CanActivate } from ' @angular/router ' ; import { AuthService } from ' ./auth.service ' ; @ Injectable ({ providedIn : ' root ' }) export class AuthGuardService implements CanActivate { constructor ( public authService : AuthService , public router : Router ) {} async canActivate (): Promise < boolean > { if ( ! await this . authService . checkAuthenticated ()) { await this . router . navigate ([ ' login ' ]); return false ; } return true ; } } Finally, add the login route and the route guard to the router setup. Open src/app/app-routing.module.ts again and add the two imports below.
import { LoginComponent } from ' ./login/login.component ' ; import { AuthGuardService } from ' ./auth-guard.service ' ; Now, change the routes array to look like the following.
const routes : Routes = [ { path : '' , component : HomeComponent }, { path : ' login ' , component : LoginComponent }, { path : ' game ' , component : GameComponent , canActivate : [ AuthGuardService ] }, ]; Well done, that's it. The application is complete!
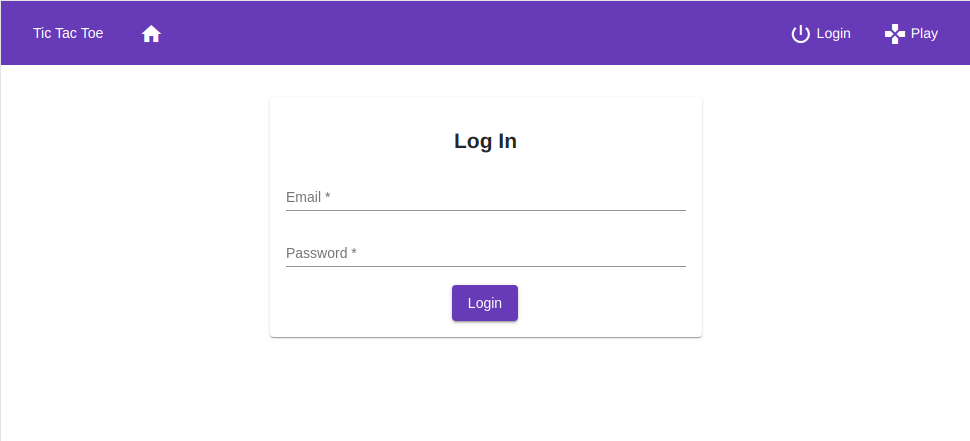
When you run the ng serve command and navigate to http://localhost:4200 you should now be able to log in and out of the application. The login form uses Material Design and should look something like the image below.
Make Angular Tests Pass With Angular Material
You generated a lot of code in this tutorial. When you created components, tests were created for those components as well. The tests merely verify the components render. If you run ng test, most of them will fail because the tests don't have the imports for the components you added. If you'd like to see what it takes to make all the tests pass, see this commit.
Learn More About Angular Material and Secure Login
In this tutorial, I showed you how to implement your own login form in an Angular application using Material Design and the Angular Material library. Coding up your own form may be a viable option if you want to present a uniform user experience. Much of this tutorial can be used for other design libraries and is not limited to Material Design but Google's Material Design standard is probably one of the most recognized user interface standards nowadays. Using it will improve the usability of your web application.
You can download the code for this tutorial from oktadeveloper/okta-angular-material-login-example.
If you want to learn more about Angular, Material Design, or ways to use Okta with Angular, feel free to check out the links below.
- Build a CRUD App with Angular 9 and Spring Boot 2.2
- How to Customize Your Angular Build With Webpack
- Build Secure Login for Your Angular App
- Build a Simple Web App with Express, Angular, and GraphQL
As usual, follow us @oktadev on Twitter and subscribe to our YouTube channel for more excellent content!
How To Create A Login Page In Angular 7
Source: https://developer.okta.com/blog/2020/01/21/angular-material-login
Posted by: gintherwascond.blogspot.com
0 Response to "How To Create A Login Page In Angular 7"
Post a Comment